Step 4 for pumping tests
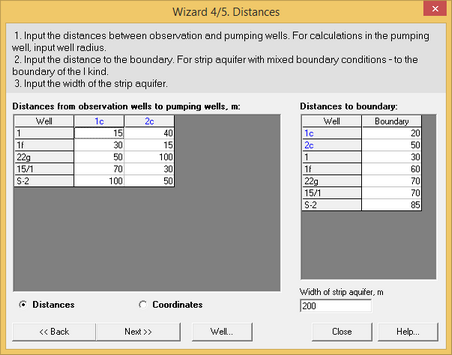
At this step, information on the distance between pumping wells (columns) and observation wells (rows) can be recorded in the "Distance from observation wells to pumping wells" table. Distances can be recorded directly or calculated from well locations. Well coordinates are not used as such in the processing and are only considered to calculate the distances between wells. If distances are entered using the "Distance" option:
Column 1: entry number
Column 2 to last: pumping wells; distance between the current pumping well and each observation well.
Rows: observation wells; distance between the current observation well and each pumping well.
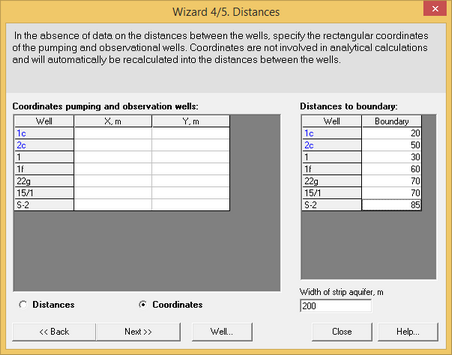
If distances are entered using the "Coordinates" option:
Column 1: well name.
Column 2: latitude.
Column 3: longitude.
Information regarding the horizontal distance to hydrological boundaries can also be entered in the "Distance to boundary" table. For stripped aquifer, the width of the aquifer should be entered. For stripped aquifers with hydrological boundaries, the distance between the well and the constant head hydrodynamic boundary is considered.
Column 1: well name
Column 2: horizontal distance to the hydrological boundary in meters.
Pumping wells are highlighted in blue colour.
Step 4. Dialog windows for pumping tests
The table must contain at least one observation well. When a pumping well is also assigned as an observation well, its radius is assigned as the distance to itself as a pumping well.
Data may be copied from the clipboard but partial entries cannot be copied. When copying from clipboard, the number of rows does not change provided the data are consistant with the format of the ANSDIMAT tables.
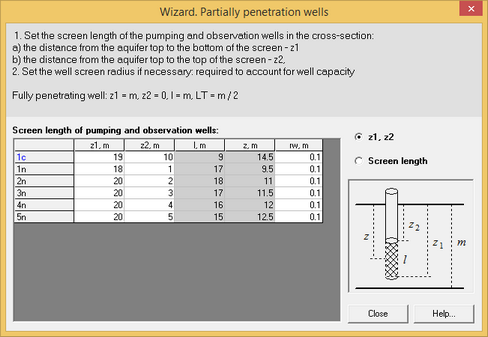
The "Well" button opens an additional dialogue window where information about "Partially penetrating wells" can be entered. By default, wells are considered to be fully penetrating. Double-clicking on the name of the well in the table automatically sets it as fully penetrating
Column 1: well name.
Column 2: z1, depth of the screen base below the top of the aquifer, m.
Column 3: z2, depth of the screen top below the top of the aquifer, m.
Column 4: l, penetration of the well into the aquifer, m.
Column 5: z, depth of the screen center below the top of the aquifer, m.
Column 6: rw, well radius, m.
Examples of the window "Partially penetrating wells" of Wizard
Two options are available:
1) "z1, z2" allows entering the depth of the screen top and base; the penetration of the well into the aquifer and the depth of the screen center below the top of the aquifer are automatically calculated by ANSDIMAT.
2) "Screen length" allows entering the penetration of the well into the aquifer and the depth of the screen center below the top of the aquifer; ANSDIMAT automatically recalculates the depth of the screen top and base below the top of the aquifer.